
How To Install Crown Molding – A Beginner’s Guide
 When you install crown molding in your room, the scenario will change into an elegant, modern place. You can install this decorative trim where the ceiling and the wall meet. Thus, people often become confused about how to install crown molding.
You may also find it slightly daunting, especially if you have no idea of installing it. But trust me, you only need the right tools, materials, and basic carpentry skills!
Reading this guide successfully, you will indeed have the skills and confidence to install crown molding. So, no more delay; start reading this guide!
What is Crown Molding?
Generally, it is a wooden decorative element providing a smooth transition between the ceiling and the wall. But it can also be made of foam, plaster, or polyurethane. Again, you can find it in different sizes and shapes.
Consequently, installing crown molding can create various visual effects, like a room appearing taller or a flat ceiling getting additional depth.
The Advantages of Crown Molding
Why should you install crown molding in your room?
Well! Crown molding offers several advantages, both in terms of aesthetics and functionality. Some key benefits you will get from installing it are:
Enhances the Appearance of a Room
It is the primary advantage: you install crown molding and add a touch of classy, significant look. You may not find it necessary. But if you do, this small detail can make a big difference in the overall appearance of your home.
Increases the Value of Your Home
Have you just moved to a new home or want to sell the old one? Then you will find this advantage better. Installing crown molding can increase the resale value of your home. Hence, the added beauty can attract homebuyers and visitors well.
Hides Imperfections
If your wall has some marks or old stains on nails, you can hide them by installing crown molding. You can conceal the flaws by using the trim. Also, there will be no cracks or uneven surfaces anymore.
Covers Wiring and Pipes
Many home improvement professionals use it to cover unsightly wiring and pipes along the ceiling or walls. So, you can install it too to get a cleaner and more streamlined room.
Improves Lighting
Install crown molding if your room hardly gets sunlight or looks slightly dark. It creates a shadow line between the ceiling and the wall to enhance lighting inside the room. Besides, you can use it to add lighting fixtures, like LED strips, to enhance room ambiance.
Provides Sound Insulation
You can install crown molding to get sound insulation by absorbing sound waves and reducing echoes. It can be particularly beneficial in rooms like music or home theater.
Safety Considerations
After knowing the benefits, you are now interested in installing it. At this stage, I should warn you about some safety measures throughout the process. Some key safety considerations to remember are:
Wear Protective Gear
As you’ll be working with power tools, you should wear some protective gear like safety glasses, gloves, and earplugs.
Use the Right Tools
Ensure that you have the correct tools to install crown molding easily. If you don’t have the right tool, it will increase the risk of accidents and injuries.
Secure the Ladder
As crown molding is installed at a certain height from the floor, you will need a ladder. But you should ensure it is on a level surface with total safety. Also, maintain three points of contact with the ladder.
Work with a Partner
Having a partner to help can make the installation job easier and safer. It can also prevent accidents and injuries by providing extra hands.
Handle Power Tools with Caution
Power tools such as saws and nail guns can be dangerous if not used properly. I suggest you read the manufacturer’s instructions when operating these tools.
Tools for Installing Crown Molding
You will need to gather all the necessary tools like these:
- Crown molding
- Miter saw
- Coping saw
- Sandpaper
- Wood glue
- Nail gun
- Tape measure
- Wood paint
- Wood filler
- Small brush or roller
Install Crown Molding Like A Pro
So, how to install crown molding like an expert? Nothing to worry about as I have shown the process in simple steps like below:
Measure the Wall Length
Take the tape measure to measure the length of the selected wall where you want to install crown molding. You can add a few extra inches for any corners or angles. Thus, you can determine the quantity of molding you will need.
Select the Crown Molding
Consider the style of your home and the existing trim and molding in the room. Then, select the crown molding that adds value to the existing decor and style of the space.
Cut the Crown Molding
After selection, you should cut it to the appropriate size. Take the miter saw and cut the molding at a 45° angle. Also, ensure the angles are cut opposite for each piece you join later. After cutting, you can use sandpaper to smooth out any rough edges or imperfections.
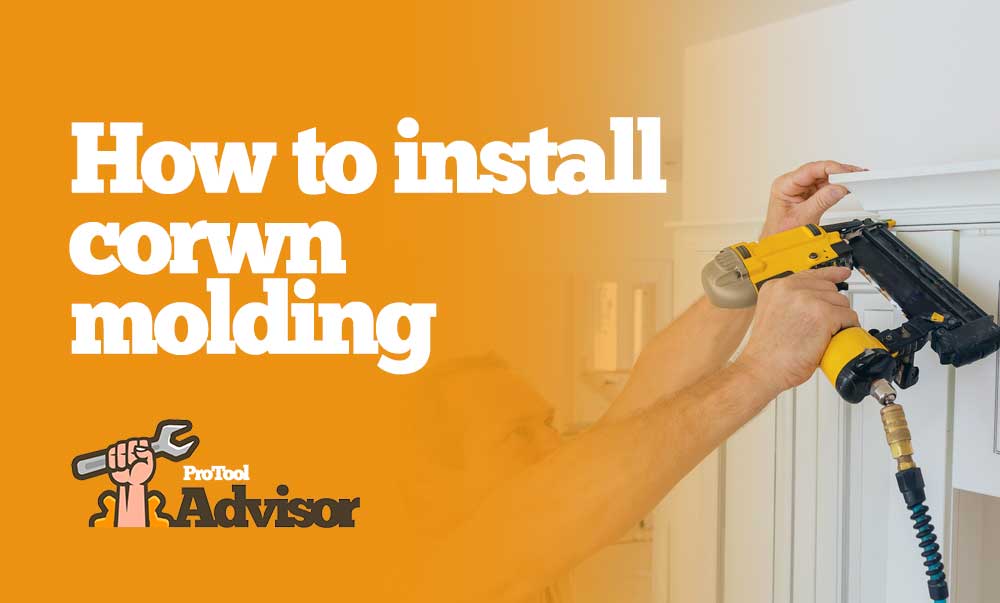
Install the Crown Molding
Here comes the foremost step: install the crown molding in the right place. I assume you have the best nail gun for crown molding. Therefore, you should start by nailing a molding piece in the room’s corner.
Then, continue nailing by ensuring that you use everything in a straight line. You may also apply some wood glue to the molding back.
Fill in the Nail Holes
Small nail holes between the molding and the ceiling or wall may be found. For this reason, you can use wood filler to fill them. Allow the wood filler to dry, and then sand it smooth.
Paint or Stain the Crown Molding
It is the final step in installing crown molding. You can paint or stain the installed crown molding to match the color of your walls or ceiling. Likewise, choose a color that complements the existing decor in the room. Apply the paint or stain evenly using a small brush or roller.
Crown Molding Installation Tips
Here are a few tips to ensure a flawless installation process:
Here are some helpful tips for installing crown molding:
Measure Accurately
Accurate measurements are crucial when installing crown molding. Make sure to measure the length of the wall accurately and cut the crown molding to the correct size.
Use Coping Techniques
For inside corners, I suggest you use a coping saw to make angled cuts in the crown molding. It will ensure a seamless joint between the two pieces of trim.
Cut the Crown Molding Upside Down
Cut the crown molding upside down on the miter saw to ensure accurate cuts.
Use a Nail Gun
A nail gun can make installation much faster and easier than a hammer and nail. Make sure to use the correct size nails for the thickness of the crown molding.
Paint or Stain Before Installing
It is often easier to paint or stain the crown molding before installing it. It can save time and reduce the risk of getting paint or stain on other surfaces.
Start with Easy Rooms
Start with a comfortable room before moving on to more challenging spaces to finish the job quickly.
Final Words
Congratulations, you have successfully installed crown molding in your home!
Now you know how to install crown molding without any redundancies. Just step back and see how nicely you have completed the job.
Try to follow all the steps correctly and get everything okay as you deserve.
Thanks for reading this beginner’s guide.